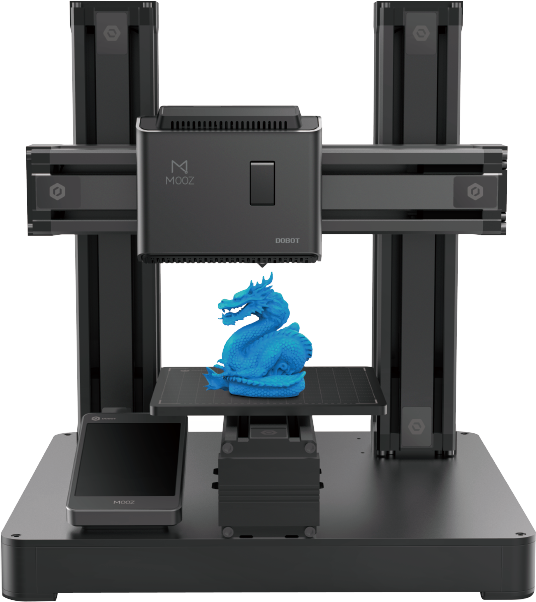
The DOBOT Mooz. (Image courtesy of Dobot.)
The hardest part of writing a review for a 3D printer is forcing yourself to stop fiddling with it for long enough to sit down and actually write the review. Even now, I catch myself pausing to check on the latest print as the DOBOT Mooz hums along beside me. I already had some experience with 3D printing at home—after finding out about the Monoprice Select Mini, I couldn't help myself—but the Mooz is more than just a 3D printer.
The Mooz becomes capable of CNC carving or laser engraving simply by swapping out the functional modules that attach to the X-axis linear actuator. It's an impressive amount of versatility to pack into a sub-$1,000 USD machine, but how well does the Mooz perform these three different functions?
Let's find out.
DOBOT Mooz Specs
Here are the specifications for each of the Mooz's three modules:
3D Printing
|
Nozzle Diameter
|
0.4 mm
|
|
Layer Resolution
|
0.05 – 0.3 mm
|
|
Extruder Temperature
|
190 – 260 C
|
|
Heated Bed Temperature
|
50 – 100 C
|
|
Build Volume
|
130 x 130 x 130 mm
|
|
Materials
|
PLA, ABS, PC, FLEX
|
|
Print Speed
|
10 – 80 mm/s
|
In terms of its 3D printing capabilities, the Mooz's specs are fairly standard.
A layer resolution of 0.05 mm is impressive at this price point—twice as good as the Monoprice Select Mini (0.1 mm). You'll get better resolutions from an Ultimaker 3 (0.015 mm) or MakerBot Replicator 2X (0.01 mm), but they're also more than triple the price of the Mooz.
(DOBOT Mooz 3D Printing.)
The Mooz has a smaller build volume than the Ultimaker 3 or Replicator 2X, but the flexibility you get from designing for 3D printing can offset that significantly by allowing users to design large models and then slice them into printable sections for assembly.
The range of printable materials available for the Mooz also covers the standard types, though we only had time to test the machine with PLA. The range given for print speed is pretty wide, but discussion of our test prints should help clarify that aspect of the Mooz in the next section.
CNC Carving
|
Max Spindle Speed
|
12,000 rpm
|
|
Chuck Clamping Range
|
0 – 4 mm
|
|
Standard Bit Size
|
3.175mm * 0.3mm * 30° flat bottom sharp cutter
|
|
Work Area
|
130mm x 130mm (z-axis depends on cutting tool)
|
|
Materials
|
Non-Metallic Materials, e.g., wood, plastics, PCB
|
It's difficult to find a comparable desktop CNC router to the Mooz, which suggests that Dobot may have found an overlooked niche in prototyping and low volume manufacturing. As a rough comparison, the Sienci Mill One has a slightly larger working area (235mm x 185mm x 100mm) and a potentially higher max spindle speed of 30,000 rpm, depending on the router. The MillRight CNC M3 kit has a working area of 260mm x 260mm x 50mm and a max spindle speed 27,000 rpm using the included DeWalt DWP611 router.
Both options are about $100 cheaper than the Mooz, but they're also dedicated routers—and there's certainly no way to add 3D printing or laser engraving capabilities to those machines for less than the difference in price.
Laser Engraving
|
Power
|
0.5W
|
|
Max Speed
|
1200mm/min
|
|
Work Area
|
130mm x 130mm
|
|
Materials
|
Wood, Paper, Leather, Some Plastics
|
As with CNC routing, the laser engraving specifications for the Mooz don't quite match up to those of dedicated laser engraving machines. The FABOOL Laser Mini, marketed as the “world's lowest priced desktop laser cutter”, starts at $598 and uses a 1.6W laser. Consequently, the FABOOL machine is able to cut a wider variety of materials than the Mooz, but it's also not capable of 3D printing or CNC routing—and since it only operates in the XY plane, adding those capabilities isn't really an option.
All of this implies that the DOBOT Mooz is what you might call a Jack of all trades, Master of one.
(DOBOT Mooz Laser Engraving.)
While it's possible to find dedicated machines for CNC routing or laser engraving with better specs at comparable price points, that doesn't appear to be the case for 3D printing. In any case, what you won't find at this price point is a machine that's capable of the trifecta of 3D printing, CNC routing and laser engraving—or even one that offers two out of three.
Flexibility is the primary advantage the DOBOT Mooz has over its competition. And if you're a start-up or a small job shop that's looking to add 3D printing capabilities, whether for prototyping or low volume production, then flexibility and low cost are likely rank high on your list of priorities. The fact that the Mooz can also be used for CNC routing and laser engraving is icing on the cake.
The DOBOT Mooz Hands-On
The Mooz isn't a plug-and-play machine, but assembly is relatively straightforward.
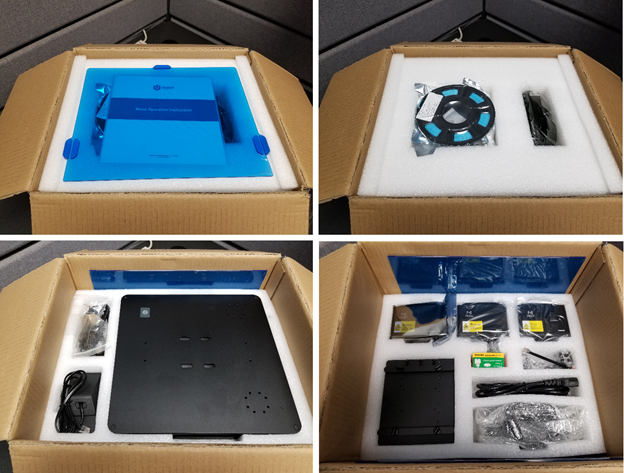
Mooz Unboxing.
Switching between the modules using four hex nuts is easy, though you shouldn't expect to do quick changes between functions for consecutive operations. That being said, if you wanted to set up a small manufacturing cell using a farm of Mooz machines, you could conceivably have a set for 3D printing, a set for routing and a set for laser engraving, with plenty of back-up modules to go around. Add a cobot for switching parts between operations and you've got a low-volume production line going.

Desktop 3D Printing
I started with the Mooz configured for the function most familiar to me: 3D printing. Setting the zero point using the A4 method was simple and easy, though the step distance behaved a bit oddly at times—jogging the motor by 1 mm somehow resulted in a 0.06 mm difference, which was finer than the finest setting of 0.1 mm.
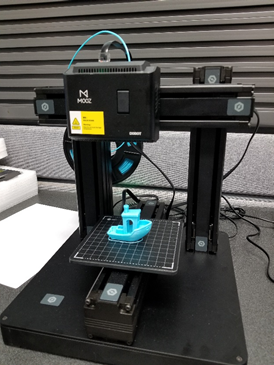
Our DOBOT Mooz completes its first print: #3DBenchy.
Software setup is a breeze for anyone familiar with Cura or other free slicing software. The recommended settings yielded a decent first print (#3DBenchy) though you may not want to have supports enabled by default. Although you can connect the Mooz directly to a PC via USB, our workspace layout necessitated using a microSD card to transfer the Gcode files.
Once it was clear that the machine was working properly, I sent out a general email to the rest of the office asking for 3D printing suggestions. The requests came pouring in, and for the next week the Mooz was running almost continuously throughout the day. The majority of the 3D prints came out well, save for a few cases in which the errors were, admittedly, my own. You can see the results below:
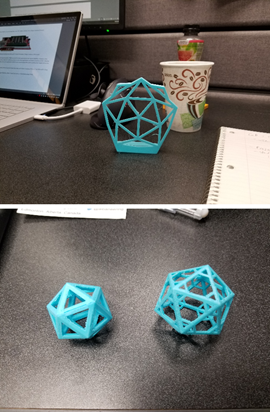
Engineering.com Geodesic V1 (top), V3 (bottom left) and V4 (bottom right).
Anyone who's had experience with 3D printing knows how much troubleshooting is involved. There are those days when it seems like you've spent more time fixing problems and printing test layers than actually making anything. Fortunately, that was never an issue for the Mooz, which proved to be a robust and reliable 3D printer.
Desktop CNC Routing
I used to think 3D printing would replace all other manufacturing processes, but now that I'm older and wiser, I recognize that there are plenty of cases where you'd be crazy to use 3D printing over a more conventional process, such as CNC machining. That's why I was excited to try out the CNC routing capabilities on the Mooz. To do that, I needed to download DOBOT's slicer software: MoozStudio.
Since you also need MoozStudio for laser engraving, it's worth pausing to give the software some consideration. The slicer is designed to take a 2D image and generate a complete Gcode program based on the parameters you input. For the router, these include:
- Speed
- Min/Max Carving Depth
- Contrast (on the image)
- Tool Diameter
- Step Depth
- Safety Height
For me, the routing function was the most intimidating because it's the process with the greatest potential for catastrophe if something goes wrong. If you screw up setting the zero point for 3D printing or laser engraving, the worst that happens is that your workpiece gets damaged or, more likely, the operation simply doesn't work at all.
If you mess up with a CNC router, however, you could end up with a broken machine.
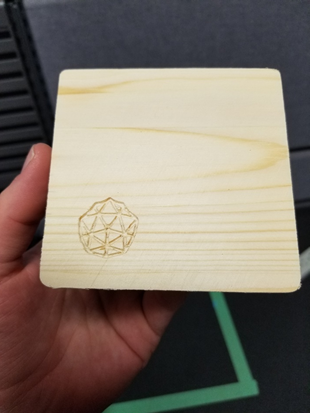
The engineering.com geodesic carved into pine.
Consequently, using the router was a matter of some very cautious trial and error. It took some time to get a feel for MoozStudio, and I'm still not completely comfortable using the software—due in large part to my inability to read Gcode beyond the superficial coordinate level.
However, there are still some peculiarities to MoozStudio regardless of your skillset. For example, the program displays imported images on a 130 x 130 grid, representing the millimeter dimensions of the Mooz on a 1-1 scale. Where this gets complicated is in translating images from pixels to millimeters.
Importing a 100 x 100 pixel image results in a 19 x 19 mm translation. Importing the same image scaled up to 200 pixels results in a 37 x 37 mm translation, and importing a 2,000 x 2,000 pixel image results in a 71 x 71 mm translation. Fortunately, this sort of software quirk is much easier to fix than a hardware issue, of which the Mooz router module had none.
Desktop Laser Engraving
Working with a laser has an intimidation factor all its own, though the concern is less about damage to the machine than to one's eyes. Of course, safety glasses are included with the Mooz. The setup for the laser is almost the same as for the router, setting the zero point at the bottom left corner of the workpiece. Doing so is a matter of making incremental stepper motor adjustments while the laser is turned on at the lowest setting.
(Tip: Make sure you use the + button to turn on the laser, rather than just hitting the ON button. Otherwise, the laser will come on at full power and could bore a hole into your workpiece.)
To determine the module's correct height, you'll need to watch how the laser spot changes as you move the Z-axis and aim for the focal point. It took a little trial-and-error—which included the inspiration for the tip above—but I was able to get it sorted in short order.
As with the router, the laser engraver gets its Gcode from Dobot's MoozStudio. Like routing, there are a few settings you can tweak—including Speed, Laser Power, Contrast and Beam Diameter—but speed seemed to make the biggest difference in terms of engraving quality. You can see a sample part that demonstrates this below:
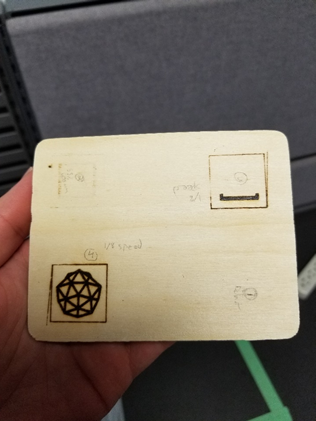
Test workpiece for the DOBOT Mooz laser engraver. The pattern on the bottom right was made with default settings and is practically invisible. The top left was engraved at the same speed but with a higher minimum laser power. The top right and bottom left were engraved at 1/8 max speed.
3D Printing for Start-ups & SMEs
After spending a couple of weeks with the Mooz, I can think of no better endorsement than the fact that I'm already trying to figure out how to convince my wife that we need a second 3D printer. My plan is to emphasize the Mooz's capabilities for CNC carving and laser engraving.
But the real question is whether this machine makes sense for start-ups and SMEs.
The two biggest things the Mooz has going for it are its low price and its flexibility, both of which are high priorities for small businesses. Where the Mooz is most lacking is in supporting software—though it's worth noting that Dobot has already released several updates for both the Mooz's firmware and MoozStudio, and will no doubt continue to do so for the foreseeable future.
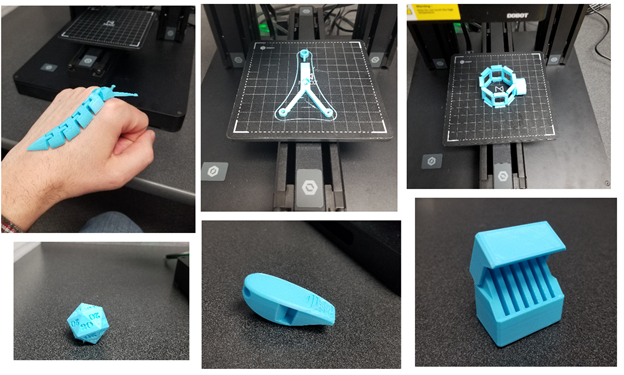
(Top) From left to right: articulated slug, filament guide, microphone shock mount.
(Bottom) From left to right: I Roll 20's D20, V29 whistle, SD card holder.
Moreover, even with my lack of Gcode skills, it's obvious that a skilled Gcode programmer could do even more with the Mooz. MoozStudio outputs the simplest path, but certainly not the most efficient one—and if you're a start-up or SME that's considering 3D printing, odds are you already have at least one person who knows their Gcode on staff.
Overall, if you're looking for an entry point into additive manufacturing and you also happen to have some light carving and laser engraving work to be done, the DOBOT Mooz is a great option.
Dobot has sponsored this article. All opinions are mine. --Ian Wright
Resource from Engineering.com